Currently, the rapid advancement of technology has positioned artificial intelligence (AI) as a fundamental pillar across various industries, from healthcare to industrial automation. However, as AI becomes more integrated into our daily systems and processes, the need arises for more sophisticated structures that not only manage individual tasks but also coordinate multiple AI functions efficiently and effectively.
This is where the concept of AI Agencies comes into play, an idea designed to foster collaboration and synergy among different AI agents. These agencies are not simply sets of algorithms working in parallel; they are integrated systems designed for multiple assistants to interact, learn, and optimize each other in real-time. This approach not only expands the capabilities of each individual agent but transforms the way we can use AI to address complex and multifaceted problems.
In this article, we will explore this concept and propose a TypeScript solution that enables the construction and management of this type of agencies, allowing customization and effective communication among assistants.
Project Motivation
The AI world is advancing by leaps and bounds. Every day new models, tools, research studies, etc. appear. One of the branches that is gaining more and more strength is the concept of Agents that interact with each other. Currently, there are several open-source projects that have implemented this solution and are totally within our reach to be used. Some of the best known are Microsoft's AutoGen project, the CrewAI framework, or Agency Swarm, which is developed by content creator VRSEN, who is continuously releasing videos about this AI agency approach. The project we will develop in this tutorial takes many of the concepts applied in this last framework.
So, if we know that several tools are at our disposal, what's the point of developing a "mini framework" that does something similar to these tools? Simply to understand the concepts and internal workings of these technologies. If you're looking to use an AI agency-based solution for your project, I strongly recommend using any of these tools. If, on the other hand, you're looking, like me, to understand how something like this can be built, I encourage you to continue with the article where we will see and explain everything in detail.
That said, let's get to it 🚀
AI Agency Concept
An AI Agency is a complex structure designed to coordinate and optimize the interaction among multiple artificial intelligence assistants. This framework integrates several key components that enable advanced functionality and effective collaboration among agents. Below, we will describe each of these components and their function within the agency:
Agent
An agent is an AI assistant that performs specific tasks based on a detailed description of its responsibilities and instructions on how to carry them out. Each agent can be equipped with various customized tools to expand its action capacity beyond its predetermined functions. In our implementation, we will use OpenAI assistants.
Mission
The agency will also define a mission, which we can consider as global instructions. Every agent will be aware of the agency's mission, so they know the ultimate goal of what they do.
Tool
Tools are functional extensions that allow agents to perform tasks that exceed their initial capabilities. These can include actions such as sending emails, performing web searches, or creating and storing documents. When defining a tool, its functionality is specified, what it can do, and the parameters necessary for its execution. Every tool will have a run method, where the assigned task is implemented. Finally, tools will be assigned to agents, who will understand their operation and use them when necessary. By "use them" we mean invoking the run method with the necessary parameters.
Thread
To facilitate communication between agents, the concept of "threads" is defined. These are objects that contain a sender agent and a recipient agent, functioning as channels through which agents can interact with each other. When creating an agency, in addition to specifying the agents that comprise it, the communications that can exist between them must be defined. Threads will be responsible for recording this information.
TalkToAgent Tool
TalkToAgent is a special tool that will be loaded by default in agents that require it. Its purpose is to facilitate the initiation of dialogues between agents. Each agent will be able to and will use this tool when they deduce they must communicate with another. To do so, they will indicate as parameters the recipient agent and the message to transmit. The implementation of this tool's run method will search for the appropriate thread that connects both agents and send the specified message. In this way, we enable agents to have the ability to communicate with each other.
User
Within the agency, there is also a "user agent," a special representation of the human user interacting with the agency. This agent will not be associated with an OpenAI assistant but will be part of the corresponding threads as a sender, thus enabling user interaction with the corresponding agents.
These are the different parts that the framework will implement. With this, to create an agency, one begins by defining and configuring individual agents, specifying their particular role and instructions to perform the tasks they must carry out. Likewise, the agency's mission is defined. Next, each agent is assigned a unique set of tools that complement and expand their intrinsic capabilities. Subsequently, possible communications between different agents are defined, thus enabling different communication threads that allow them to interact in a coordinated manner, sharing information and collaborating on complex tasks. It will also be specified which agents the user can communicate with. With all this, the agency is ready to start working. A simple message from the user to one of the agents will set everything in motion.
Project Requirements
Having explained the concept of AI Agency and what is required to make it work, we will now define some requirements that our software must meet so that we can use and extend it in a robust and efficient manner:
- Web Interface: We need a web interface that allows visualizing all communication between each Agent and enables the user to communicate with relevant agents.
- REST API: There must be a REST API that allows consuming the agency's information and interacting with it. The web interface will use this API to obtain all necessary data and send user messages.
- Module Separation: It is fundamental that modules are completely separated, clearly differentiating the base implementation of the agency from the definition of a specific agency. One module will be responsible for implementing the foundations, while another module will consume this base implementation and create the agency. This is crucial to allow the creation of different agencies within the same framework in a simple way, which will give us the ability to test different approaches in an agile and effective manner.
- Data Persistence: In case the application restarts, it is necessary that the previous state is maintained, including created agents, threads, messages, etc. We don't want everything to be built from scratch every time we start the project.
Framework Architecture
To meet the above requirements, we have opted for the following architecture:
Monorepo with TypeScript and pnpm
Modularity is important and we seek an agile and efficient work environment. For this reason, we have chosen a monorepo architecture, similar to the one described in this article, which explains how to build a monorepo using tools like pnpm. Additionally, in this case we will also rely on the turborepo tool to facilitate project creation and management.
Python or TypeScript
Initially, it might seem logical to use Python for this project, given that it is the dominant language in natural language processing applications. However, after an exhaustive analysis, we have decided to use TypeScript. The reasons for this decision are as follows:
- My experience and mastery in TypeScript far exceed those in Python. TypeScript is the language I use daily in real, large-scale projects, while my experience with Python is limited to small exploratory projects.
- Although Python is dominant in this field, TypeScript is not left behind. Tools like LangChain, LlamaIndex, and the OpenAI API have TypeScript support.
- The use of TypeScript simplifies the implementation of the proposed architecture based on a monorepo environment. Integrating Python into this ecosystem would complicate things.
Despite these reasons, I still have doubts and do not rule out the possibility of migrating the framework to Python in the future, as an opportunity to learn and become more familiar with this language.
User Interface with Next.js
The main web application in the monorepo, called web, will be developed using Next.js. Its main function will be to facilitate user interaction with the agency and allow them to visualize communication between different agents in an organized manner. In this first version, the application will simply display the communication "threads" between agents, which will allow viewing exchanged messages. Additionally, when the user is the sender of a thread, they will be given the ability to send messages to the recipient agent. This functionality not only improves interactivity but also provides detailed tracking of interactions within the agency.
agency Package
The system's core resides in the agency package, where the agency's main architecture is defined. This package is responsible for implementing all agency functionality and publicly exposing the classes or functions necessary for creating agencies.
This package includes the following parts:
- Base Classes: The fundamental classes for creating an agent (
Agent) and a tool (Tool) are defined, as well as classes for threads (Thread) and messages (Message) that facilitate communication between agents. - Agency Class: Presented as an abstract class. It implements the functionality necessary for the agency's execution, but delegates the following aspects to whoever extends it:
- Definition of the agents that make up the agency.
- Definition of the different communications that can exist between different agents.
- Definition of a folder where agency information can be persisted, ensuring its state is not lost in case of execution restart.
- REST API: A notable feature of our agency is that it will launch an Express server to allow interaction with its objects through an API, thus facilitating access to its data or interaction with it. The
webapplication will connect to this API to communicate with the agency. - Server Sent Events: The
webapplication will need to receive messages as they are generated and display them as they occur. For this, in addition to the REST API, we need a mechanism that allows sending data from server to client. To solve this, we have opted to implement Server Sent Events. When the web loads a thread, it will enable a listening mechanism. When the agency generates a new message, it will emit it to the client through this mechanism. This way, we keep messages updated in real-time on the web. - OpenAI: As mentioned earlier, to interact with the LLM we will use the OpenAI API directly. Each agent will create an OpenAI assistant through which it will communicate with other agents.
Agency Implementation
With the agency package available, all that remains is to use it to define the agencies we want. For this, we will enable a new application in the monorepo that we will call back, which will have a dependency on this agency package. In this article, we will not delve into this part, as our goal is to explain the foundations for creating agencies, not their detailed definition. In subsequent articles, we will use this base to create different agencies capable of solving real problems.
web App Implementation
We will not delve into the explanation of this particular part. It is a very simple Next project that consists of a single screen. On this screen, a side menu is presented that lists all communication threads, while messages from the selected thread are shown on the right. This project uses a service to make API calls and obtain necessary data.
When a thread's screen loads, it is verified whether the user is part of that thread. If so, a text field at the bottom is enabled along with a send button, allowing the user to send messages in that specific thread.
The implementation is available in the GitHub repository mentioned at the end of the article. However, given that this topic moves away from the main purpose of this article, I consider it unnecessary to delve into the details of this implementation.
agency Package Implementation
We are going to examine in detail how an agency's core is implemented, as well as the different parts that compose it and how they relate to each other.
User Class
The User class represents an entity with communication capability in the system. This can be both an AI agent and the real user using the agency. Agents extend this User class, which is a simple model with id and name properties.
export class User {
  constructor(
    public id: string,
    public name: string,
  ) {}
}
The real user is represented as an instance of this class.
Agent
The Agent class serves as the base for creating the agents that make up the agency. This class has properties to define the different characteristics of an agent, such as its name, instructions, or the tools assigned to it. Additionally, it has a main method that we call init, where the initialization of the associated assistant in OpenAI is carried out.
  async init() {
    if (this.id) {
      let openAiAssistant = await openaiClient.beta.assistants.retrieve(
        this.id,
      );
      const shouldUpdate = this.shouldUpdate(openAiAssistant);
      if (shouldUpdate) {
        openAiAssistant = await openaiClient.beta.assistants.update(
          this.id,
          this.generateBody() as AssistantUpdateParams,
        );
      }
      this.assistant = openAiAssistant;
      if (shouldUpdate) this.delegate.onUpdateAgent(this);
    } else {
      this.assistant = await openaiClient.beta.assistants.create(
        this.generateBody() as AssistantCreateParams,
      );
      this.id = this.assistant.id;
    }
  }
This method determines whether the agent has been assigned an ID, indicating whether it already exists in OpenAI. If it exists, it is retrieved; otherwise, a new one is created. Additionally, it uses the private shouldUpdate method to verify whether it needs to be updated. This is crucial to ensure that changes made to the agent, such as updating its instructions, are reflected in the OpenAI assistant. It also ensures that new assistants are not being created every time the application starts.
A notable feature of the Agent class is its use of the Observer pattern to notify other objects about certain events. Specifically, it notifies when the agent is updated in OpenAI. Later, we will see how the Agency class will act as the delegate or observer, using this event to carry out specific actions.
Message
A simple but important part of our system is the Message class, which represents each of the messages generated during execution. It is a model class with the properties we want to record.
export class Message {
  id: string;
  date: Date;
  type: MessageType;
  content: string;
  from: User;
  to: User;

  constructor({ id, date, type, content, from, to }: Props) {
    this.id = id;
    this.date = date;
    this.type = type;
    this.content = content;
    this.from = from;
    this.to = to;
  }
}
Tool
We define the Tool class to represent the different tools assigned to agents to give them functionalities. On one hand, it defines the properties that OpenAI needs for tool creation: the name, description, and definition of the parameters it can receive. On the other hand, it defines an abstract run method that each Tool must implement to execute the tasks it must perform. As we will see later, the system will be prepared so that when an agent deduces that a tool must be executed, this run method is invoked with the parameters the agent indicates.
export abstract class Tool {
  name: string;
  description: string;
  parameters: any;

  constructor({ name, description, parameters }: ToolParams) {
    this.name = name;
    this.description = description;
    this.parameters = parameters;
  }

  abstract run(parameters: RunProps): Promise<string>;
}
Thread
The Thread class is fundamental in the system, as it facilitates communication between agents by allowing the exchange of messages between them. This class is responsible for interacting with OpenAI to send messages and manage received responses.
Several properties stand out in this class, among which are senderAgent and recipientAgent, which are objects representing the two agents (or users) involved in communication. Additionally, it has the messages property, which is a list of Message type objects and is used to store messages generated during communication.
As for methods, on one hand we have init, which is responsible for initializing the Thread in OpenAI. As with agents, this method uses the id property to determine whether the record already exists and only needs to be retrieved, or if, on the contrary, it doesn't exist and must be created in OpenAI. We will see later how Agency will create these Thread objects with or without an id, to indicate whether it already exists based on the information it has in its persistence layer.
  async init() {
    if (this.id) {
      this.thread = await openaiClient.beta.threads.retrieve(this.id);
    } else {
      this.thread = await openaiClient.beta.threads.create();
      this.id = this.thread.id;
    }
  }
On the other hand, we have the send method. This method is called every time a message must be sent to recipientAgent.
  async send(message: string, retries: number = 1): Promise<string> {
    if (!this.recipientAgent.id) throw new Error("Recipient agent not set");
    if (!this.thread) await this.init();
    await openaiClient.beta.threads.messages.create(this.id, {
      role: "user",
      content: message,
    });
    this.run = await openaiClient.beta.threads.runs.create(this.id, {
      assistant_id: this.recipientAgent.id,
    });
    this.addNewMessage(MessageType.Text, message);
    while (true) {
      await this.waitUntilDone();
      if (this.run.status === "completed") {
        const _message = await this.extractMessage();
        this.addNewMessage(MessageType.Text, _message, true);
        return message;
      } else if (this.run.status === "requires_action") {
        await this.processAction();
      } else {
        const err = "Run failed: " + this.run.status;
        console.log(err);
        if (retries < MAX_RETRIES) {
          console.log("Retrying in 30s...");
          await new Promise((resolve) => setTimeout(resolve, 30000));
          return this.send(message, retries + 1);
        }
        const _message = this.generateFailedMessage();
        this.addNewMessage(MessageType.Text, _message, true);
        return _message;
      }
    }
  }
Let's look in detail at the process carried out here. First, we verify that the recipient agent is properly initialized. Then, we check if the thread is initialized; if not, we initialize it. Next, we create the message in the OpenAI assistant and subsequently create the run object, provided by OpenAI, which allows us to control message sending and response reception.
Next, we add the message to the list and start an infinite loop to control the response. Within this loop, we first use a private method to verify the run status and continue only when it has an appropriate status.
  private async waitUntilDone() {
    while (["queued", "in_progress", "cancelling"].includes(this.run.status)) {
      await new Promise((resolve) => setTimeout(resolve, 1000));
      this.run = await openaiClient.beta.threads.runs.retrieve(
        this.id,
        this.run.id,
      );
    }
  }
When the run reaches a status that allows us to handle the response, we will act accordingly. If the status is completed, we know we have received a definitive response from the assistant, so we can process it, generate a new message, and conclude this execution. To process the response, we rely on another private method called extractMessage.
  private async extractMessage() {
    const messages = await openaiClient.beta.threads.messages.list(this.id);
    const content = messages.data[0].content[0];
    if (content.type === "text") {
      return content.text.value;
    } else {
      throw new Error(
        "Framework does not support messages different than text yet.",
      );
    }
  }
However, OpenAI assistants don't always provide a direct response. If they have been equipped with tools and during execution determine they need to use any of them, they will indicate this by setting a status value of requires_action in the run and will provide everything necessary to carry out the action. When this happens, we will use another private method called processAction to manage said action.
  private async processAction() {
    const toolsToExecute =
      await this.run.required_action.submit_tool_outputs.tool_calls;
    const toolsResults = [];
    for (const toolToExecute of toolsToExecute) {
      this.addNewMessage(
        MessageType.Action,
        `Action required. Executing tool ${toolToExecute.function.name} with parameters ${toolToExecute.function.arguments}`,
        true,
      );
      const toolName = toolToExecute.function.name;
      const tool = this.recipientAgent.tools.find((t) => t.name === toolName);
      const toolResult = tool
        ? await tool.run({
            ...JSON.parse(toolToExecute.function.arguments),
            callerAgent: this.recipientAgent,
          })
        : "ERROR: there is no tool with the name you indicated. Try again with the correct name. The list of available tools is as follows: " +
          this.recipientAgent.tools.map((t) => t.name).join(", ");
      this.addNewMessage(
        MessageType.Action,
        `${toolToExecute.function.name} completed. Response: ${toolResult.toString()}`,
        true,
      );
      toolsResults.push({
        tool_call_id: toolToExecute.id,
        output: toolResult.toString(),
      });
    }
    this.run = await openaiClient.beta.threads.runs.submitToolOutputs(
      this.id,
      this.run.id,
      {
        tool_outputs: toolsResults,
      },
    );
  }
This method basically extracts information from the response to determine which tools must be executed. It then goes through each of these tools and performs the following actions:
- Saves the message to record that a tool is going to be executed.
- Searches for this tool by its name within the agent's tools and executes it to obtain a result. If it doesn't find the tool, it directly generates an error result.
- Saves a new message to record the result of invoking said tool.
When the invocation of all tools indicated by the agent is finished, the obtained results are sent to OpenAI, so the assistant knows how to continue its execution. This last step will also update the run object, which will allow the main loop to continue its process.
Returning to the main loop, we also handle the case where the status is neither completed nor requires_action. In this case, OpenAI indicates that some type of error has occurred. Sometimes, this can be simply due to API malfunction at that moment. That's why we establish a retry mechanism. When we reach this part of the code, we pause execution for 30 seconds and try the process again from the beginning. If after 3 attempts the problem persists, we finish with a manual error message.
To conclude, it's important to mention that like the Agent class, the Thread class also uses an Observer pattern to inform a delegate when a new message is added. This is done through the ThreadDelegate interface. The private addNewMessage method uses this delegate to send it the message that has just been recorded. Later, we will see how the Agency class will register as a delegate and execute certain actions when this event occurs.
  private addNewMessage(type: MessageType, content: string, inverse = false) {
    const message: Message = {
      id: Math.random().toString(),
      date: new Date(),
      type,
      content,
      from: inverse ? this.recipientAgent : this.senderAgent,
      to: inverse ? this.senderAgent : this.recipientAgent,
    };
    this.messages.push(message);
    this.delegate.onNewMessage(this, message);
  }
We can conclude this section by mentioning that the Thread class is a key piece in our system, as it is where all interaction with OpenAI resides for sending messages, managing responses, and invoking possible tools.
Api
As we saw earlier, one requirement we have is to enable the exposure of the agency's data and allow interaction with it through a REST API. The Api class assumes this responsibility.
This class relies on the Express library to create a simple REST API with the endpoints we need. Through the constructor, we require it to receive the Agency class instance, which it will use to access its data. We also allow choosing the port on which to expose this API from the constructor.
The class has an init method in which express will be initialized and different endpoints will be defined.
  async init() {
    const agency = this.agency;

    const app = express();
    app.use(express.json());
    app.use(sseMiddleware);
    app.use(cors());

    app.get("/ping", async (_: Request, res: Response) => {
      try {
        res.send({ hello: "world" });
      } catch (err) {
        res.status(500).send({ error: err });
      }
    });

    app.get("/info", async (_: Request, res: Response) => {
      try {
        res.send({
          name: agency.name,
          mission: agency.mission,
          agents: agency.agents.map((agent) => ({
            name: agent.name,
            id: agent.id,
          })),
        });
      } catch (err) {
        res.status(500).send({ error: err });
      }
    });

    //-------Rest of endpoints-------

  }
Something notable in this class is the clients property, which will be a list of SseClient objects, a class we'll explain shortly. This is how we manage to enable communication based on Server-sent events. We previously explained that this is important to be able to send messages to the client as they are generated so it can update the interface with each event. For this, we rely on the express-sse-middleware library that enables an Express middleware for using this technology. In the previous init, you can see how this middleware is initialized. To use this functionality, we equip the API with an endpoint that is responsible for creating a new SseClient.
    app.get(
      "/threads/:threadId/sseClient",
      async (req: Request, res: Response) => {
        try {
          const { threadId } = req.params;
          const sseClient = new SseClient(threadId, res.sse());
          this.clients.push(sseClient);
          req.on("close", () => {
            this.removeSseClient(threadId);
          });
        } catch (err) {
          res.status(500).send({ error: err });
        }
      },
    );
The SseClient class simply records the id of the Thread to which the client is connected and the object itself that allows communication, obtained from res.sse()
export class SseClient {
  private client: any;

  constructor(
    public threadId: string,
    client: any,
  ) {
    this.client = client;
  }

  send(data: any) {
    this.client.send(JSON.stringify(data));
  }

  close() {
    this.client.close();
  }
}
The SseClient class has 2 methods, one to send a message to the client and another to close communication.
Returning to the Api class, we define another method sendMessage, which receiving the id of a Thread and the Message object is responsible for analyzing whether there is any client connected to that thread and, if so, sending them the message. This method is used by the Agency class to report new messages that are generated.
  sendMessage(threadId: string, message: Message) {
    if (!this.clients) return;
    const sseClient = this.clients.find(
      (client) => client.threadId === threadId,
    );
    if (!sseClient) return;
    sseClient.send({
      date: message.date,
      type: message.type,
      content: message.content,
      from: message.from.name,
      to: message.to.name,
    });
  }
Finally, the Api class has a removeSseClient method, responsible for cleaning up a connection. This method is executed when the server detects that a client ends communication, thus freeing resources that are no longer useful. In the /threads/:threadId/sseClient endpoint we saw a bit earlier, you can see how this method is called when a connection closure is detected.
  removeSseClient(threadId: string) {
    if (!this.clients) return;
    const sseClient = this.clients.find(
      (client) => client.threadId === threadId,
    );
    if (!sseClient) return;
    sseClient.close();
    this.clients = this.clients.filter(
      (client) => client.threadId !== threadId,
    );
  }
Agency
At this point, we have outlined the different key parts that define our agency. Now all that remains is to understand how to put them all into operation together. The Agency class will assume this responsibility.
The Agency class will be an abstract class that will have its own properties and methods to allow proper agency execution, but will delegate to whoever uses it the details of said agency's definition. This is crucial and we'll see why. This class will be responsible for tasks such as starting agents, threads, persisting data, etc. However, we don't want this class to make decisions about which agents make up the agency or where data is persisted. These are responsibilities of the application that uses this class. For this reason, we define 3 abstract methods:
- The
getAgentsmethod, which should return the desired list of agents. - The
getAgentCommunicationsmethod, which, when passed an agent, should tell us which other agents it can communicate with. - The
getDBPathmethod, which should return the path of a folder in which the agency can save the information necessary to ensure data persistence. This is key because this way this class manages data persistence but the space where it is stored is the responsibility of whoever uses it.
We continue with this class's properties. On one hand, we have the agency's name and mission: name and mission. These properties can be defined from the constructor. The class will initialize a User instance to represent the user using the agency. Additionally, it will have properties to record the list of agents (Agent) or threads (Thread). It will also have a property to record the path where data is persisted, dbPath, and an instance of the Api class.
export abstract class Agency implements ThreadDelegate, AgentDelegate {
  name: string;
  mission: string;

  user: User;
  agents: Array<Agent>;
  threads: Array<Thread>;
  api: Api;
  dbPath: string;

  constructor({ name, mission }: AgencyParams) {
    this.name = name;
    this.mission = mission;
    this.user = new User("user", "User");
  }

  abstract getAgents(): Agent[];
  abstract getAgentCommunications(agent: User): Agent[];
  abstract getDBPath(): string;

  /**
   * --- Methods ---
   */

}
As for methods, we start with initApi, which simply is responsible for initializing the Api class instance.
  async initApi(port: number) {
    this.api = new Api(this, port);
    await this.api.init();
  }
We continue with the run method. This is where the definition of all needed entities is carried out.
  async run() {
    this.dbPath = this.getDBPath();
    this.agents = this.getAgents();
    if (!this.agents || this.agents.length === 0)
      throw new Error(
        "You can't init without defining any agents. User will talk to first defined agent",
      );
    for (const agent of this.agents) {
      agent.id = this.getSavedAgentId(agent);
      agent.setDelegate(this);
      if (this.mission)
        agent.instructions = `${this.mission}\n\n${agent.instructions}`;
      this.addCommonTools(agent);
      await agent.init();
    }
    this.threads = [];
    for (const agent of [this.user, ...this.agents]) {
      const recipientAgents = this.getAgentCommunications(agent);
      for (const recipientAgent of recipientAgents) {
        const thread = new Thread({
          id: this.getSavedThreadId(agent, recipientAgent),
          senderAgent: agent,
          recipientAgent,
          delegate: this,
        });
        thread.messages = this.getSavedMessages(thread.id);
        await thread.init();
        this.threads.push(thread);
      }
    }
    this.saveAgentsAndThreads();
  }
Basically what this method does is initialize agents and threads. As we mentioned, we rely on abstract methods for the application to give us the details. We also see how private methods are used to check whether a certain agent or thread already exists, which will allow deciding whether it should be created from scratch or use the existing one. The same for loading messages generated in previous executions.
Next, we will see the methods used to implement the data persistence mechanism. As we'll see, we're saving JSON files in the folder that the child class has specified. This data persistence mechanism is very basic and not very robust. It would be much more interesting to implement a database that records this information, but for simplicity this solution has been chosen. A very clear improvement to this project is migrating this part to a mechanism based on a conventional database.
  private getSavedAgentId(agent: Agent): string {
    const agentsDataStr = this.readFileContentOrCreate(
      path.resolve(this.dbPath, "./agents.json"),
    );
    const agentsData = agentsDataStr ? JSON.parse(agentsDataStr) : [];
    const agentData = agentsData.find((a: any) => a.name === agent.name);
    return agentData ? agentData.id : null;
  }
private getSavedThreadId(senderAgent: User, recipientAgent: User): string {
const threadsDataStr = this.readFileContentOrCreate(
path.resolve(this.dbPath, "./threads.json"),
);
const threadsData = threadsDataStr ? JSON.parse(threadsDataStr) : [];
const threadData = threadsData.find(
(t: any) =>
t.senderAgent === senderAgent.id &&
t.recipientAgent === recipientAgent.id,
);
return threadData ? threadData.id : null;
} private getSavedMessages(threadId: string): Message[] {
const messagesDataStr = this.readFileContentOrCreate(
path.resolve(this.dbPath, "./messages.json"),
);
const messagesData = messagesDataStr ? JSON.parse(messagesDataStr) : [];
const messages = messagesData
.filter((m: any) => m.threadId === threadId)
.map((message: any) => {
const fromUser = message.from === this.user.id;
const toUser = message.to === this.user.id;
return new Message({
id: message.id,
date: new Date(message.date),
type: message.type,
content: message.content,
from: fromUser
? this.user
: this.agents.find((a) => a.id === message.from),
to: toUser ? this.user : this.agents.find((a) => a.id === message.to),
});
});
return messages;
}When the initialization of all entities has been completed, we invoke the saveAgentsAndThreads method, which persists the current state of agents and threads, ensuring we always have everything properly synchronized.
  private saveAgentsAndThreads(): void {
    const agentsData = this.agents.map((agent) => ({
      name: agent.name,
      id: agent.id,
    }));
    fs.writeFileSync(
      path.resolve(this.dbPath, "./agents.json"),
      JSON.stringify(agentsData),
    );
    const threadsData = this.threads
      .filter((t) => t.id !== null)
      .map((t) => ({
        id: t.id,
        recipientAgent: t.recipientAgent.id,
        senderAgent: t.senderAgent.id,
      }));
    fs.writeFileSync(
      path.resolve(this.dbPath, "./threads.json"),
      JSON.stringify(threadsData),
    );
  }
When these initApi and run methods have been executed, the agency will be fully ready to be used. Now comes into play the processUserMessage method, which will be called every time a user communicates with an agent.
  async processUserMessage(threadId: string, message: string): Promise<string> {
    const thread = this.threads.find((thread) => thread.id === threadId);
    if (!thread) throw new Error("Thread not found");
    if (thread.senderAgent !== this.user)
      throw new Error("User can't send message to this thread");
    return await thread.send(message);
  }
It simply retrieves the Thread and executes its send method.
This Agency class also exposes the getThread and getAgentByName methods, which will be used by Api to obtain a thread or an agent.
  getThread(senderAgentName: string, recipientAgentName: string) {
    return this.threads.find(
      (thread) =>
        thread.senderAgent.name === senderAgentName &&
        thread.recipientAgent.name === recipientAgentName,
    );
  }

  getAgentByName(agentName: string) {
    return this.agents.find((agent) => agent.name === agentName);
  }
We continue with interface implementation. Remember when we explained the Agent or Thread classes and mentioned they used an Observer pattern? Well, this Agency class will be responsible for implementing this functionality and registering as a delegate. If we look at the run method, when an agent or thread is created, we'll see that the instance of this Agency class is sent to the delegate property. Additionally, in the Agency class definition, we specify that it will implement the methods of ThreadDelegate and AgentDelegate. Finally, in the lower part of the class, we carry out these implementations. Basically, we use this mechanism to be able to persist data when an agent is updated or a thread saves a new message.
  /**
   * ThreadDelegate implementation
   */
  onNewMessage(thread: Thread, message: Message): void {
    if (!this.api) return;
    this.api.sendMessage(thread.id, message);
    const messagesDataStr = this.readFileContentOrCreate(
      path.resolve(this.dbPath, "./messages.json"),
    );
    const messages = messagesDataStr ? JSON.parse(messagesDataStr) : [];
    messages.push({
      id: message.id,
      threadId: thread.id,
      date: message.date.toISOString(),
      type: message.type,
      content: message.content,
      from: message.from.id,
      to: message.to.id,
    });
    fs.writeFileSync(
      path.resolve(this.dbPath, "./messages.json"),
      JSON.stringify(messages),
    );
  }
/**
* AgentDelegate implementation
*/
onUpdateAgent(agent: Agent): void {
const agentsDataStr = fs.readFileSync(
path.resolve(this.dbPath, "./agents.json"),
"utf-8",
);
const agentsData = JSON.parse(agentsDataStr);
const agentData = agentsData.find((a: any) => a.id === agent.id);
agentData.name = agent.name;
fs.writeFileSync(
path.resolve(this.dbPath, "./agents.json"),
JSON.stringify(agentsData),
);
const threadsDataStr = fs.readFileSync(
path.resolve(this.dbPath, "./threads.json"),
"utf-8",
);
const threadsData = JSON.parse(threadsDataStr);
const threadsDataFiltered = threadsData.filter(
(t: any) => t.senderAgent !== agent.id && t.recipientAgent !== agent.id,
);
fs.writeFileSync(
path.resolve(this.dbPath, "./threads.json"),
JSON.stringify(threadsDataFiltered),
);
const messagesDataStr = fs.readFileSync(
path.resolve(this.dbPath, "./messages.json"),
"utf-8",
);
const messagesData = JSON.parse(messagesDataStr);
const messagesDataFiltered = messagesData.filter(
(m: any) => m.from !== agent.id && m.to !== agent.id,
);
fs.writeFileSync(
path.resolve(this.dbPath, "./messages.json"),
JSON.stringify(messagesDataFiltered),
);
}Finally, there is an important detail we've overlooked that is worth highlighting: the private addCommonTools method. This method is responsible for assigning to an agent the tools we want to give it by default. In the run method, when initializing the agent, we call this method to load these tools. For the moment, we only have one common tool, called TalkToAgent. In the next section, we will explain it in detail, but in summary, this tool allows agents to communicate with each other. For this reason, we will only load this tool in agents that can communicate with others, that is, those whose recipientAgents list is not empty.
  private addCommonTools(agent: Agent) {
    const recipientAgents = this.getAgentCommunications(agent);
    if (recipientAgents.length > 0) {
      agent.addTool(
        new TalkToAgent({
          senderAgent: agent,
          agency: this,
        }),
      );
    }
  }
TalkToAgent
The TalkToAgent class is a specialized tool designed to facilitate direct and synchronous communication between agents within the agency. Its main objective is to allow an agent to send a message directly to another specific agent and receive an exclusive response from that agent.
When using this tool, an agent can send a message using the following parameters:
recipient: Specifies the name of the recipient agent to whom the message will be sent.message: Describes the task that the recipient agent must complete.
We create this class by extending from Tool and specifying its name, description, and the parameters it uses. We also require that the agent using it and the agency instance be sent, since we will need these objects in the run
export class TalkToAgent extends Tool {
  senderAgent: Agent;
  agency: Agency;
  constructor({ senderAgent, agency }: Props) {
    super({
      name: "TalkToAgent",
      description:
        "Use this tool to facilitate direct and synchronous communication between specialized agents within the agency. When you send a message using this tool, you will receive a response exclusively from the designated recipient agent. To continue the dialogue, invoke this tool again with the desired recipient agent and your follow-up message. Remember, communication here is synchronous; the recipient agent will not perform any task after the response. You are responsible for transmitting the recipient agent's responses back to the user, as the user does not have direct access to these responses. Continue interacting with the tool for continuous interaction until the task is completely resolved.",
      parameters: {
        type: "object",
        properties: {
          recipient: {
            type: "string",
            description:
              "Please specify the name of the recipient agent",
          },
          message: {
            type: "string",
            description:
              "Please specify the task that the recipient agent must complete. Focus on clarifying what the task consists of, rather than providing exact instructions.",
          },
        },
        required: ["message"],
      },
    });
    this.senderAgent = senderAgent;
    this.agency = agency;
  }

  async run(parameters: RunProps): Promise<string> {
    const senderName = this.senderAgent.name;
    const recipientName = parameters.recipient;
    const message = parameters.message;
    const thread = this.agency.getThread(senderName, recipientName);
    if (!thread) return "ERROR: You cannot communicate with that agent.";
    return await thread.send(message);
  }
}
In the constructor, we define this tool's description, so OpenAI knows how to use it and in the same way we explain how the 2 parameters it has work. On the other hand, in the run, what we do is use the agency's getThread method to retrieve the thread that connects the 2 agents. Then we add a new message to it and return its response.
back App Implementation
Let's move on to the last part of the monorepo, the back app, which will be responsible for building the agency. As we've already mentioned, this article is about explaining the guidelines for building agencies, but not about building any particular agency. In subsequent articles, we will create examples of agencies based on this framework. In these examples, it will be in this back part where we will mainly work, defining agents, tools, etc. Despite this, I do consider it necessary to finish the article by seeing an example of how everything mentioned can be used. For this, we are going to build a "mini project" that allows us to put things into operation.
For this, we are going to build an agency that helps the user solve basic mathematical operations. In a real case, it would never make sense to use an agency for this; any assistant on its own would do perfectly what we are going to propose. But it serves to illustrate how the agency works.
We are going to define 2 agents, a main one (MainAgent) that will interact with the user and a secondary one (MathAgent) that will be the one to whom mathematical calculations that need to be done will be delegated. That is, when MainAgent detects that the conversation requires performing a mathematical operation, instead of doing it itself, it will send a message to MathAgent asking it to perform that operation and MainAgent will use the response it gets to continue its conversation.
MathAgent
Let's start by defining MathAgent
export class MathAgent extends Agent {
  constructor() {
    super({
      name: "MathAgent",
      description: path.resolve(__dirname, "./description.md"),
      instructions: path.resolve(__dirname, "./instructions.md"),
      tools: [new OperationTool()],
    });
  }
}
As a description, we assign the following:
You are an agent specialized in performing mathematical operations.And as for instructions:
Answer the user about any mathematical operation they consult you about. Rely on the tool you have to perform the operation.With this we let the agent know what its function is, quite simple in this case. Now let's go with the tools, specifically with the only one we've assigned to it, OperationTool
export class OperationTool extends Tool {
  constructor() {
    super({
      name: "OperationTool",
      description:
        "Use this tool to perform mathematical operations. You must specify the type of operation you want to perform and the two numbers you want to operate on. You can choose between 'add', 'subtract', 'multiply' or 'divide'.",
      parameters: {
        type: "object",
        properties: {
          operation: {
            type: "string",
            enum: ["add", "subtract", "multiply", "divide"],
            description:
              "The operation you want to perform. It can be 'add' to add, 'subtract' to subtract, 'multiply' to multiply or 'divide' to divide",
          },
          number1: {
            type: "number",
            description:
              "The first value of the mathematical operation you want to perform",
          },
          number2: {
            type: "number",
            description:
              "The second value of the mathematical operation you want to perform",
          },
        },
        required: ["operation", "number1", "number2"],
      },
    });
  }

  //----------- Run method ---------------------------

}
As we see, we create a class that extends from Tool and in its definition we specify what this tool does and the parameters it must receive when invoked. This is how we tell the agent how to use this tool. All that remains is to implement the run method to carry out its execution.
  async run(parameters: OperationRunProps): Promise<string> {
    const { operation, number1, number2 } = parameters;
    try {
      switch (operation) {
        case "add":
          return `The result of adding ${number1} and ${number2} is ${number1 + number2}`;
        case "subtract":
          return `The result of subtracting ${number1} and ${number2} is ${number1 - number2}`;
        case "multiply":
          return `The result of multiplying ${number1} and ${number2} is ${number1 * number2}`;
        case "divide":
          return `The result of dividing ${number1} by ${number2} is ${number1 / number2}`;
        default:
          return "Please specify a valid operation: 'add', 'subtract', 'multiply' or 'divide'";
      }
    } catch (e) {
      console.log("Error in OperationTool.run", e);
      return "I couldn't perform the operation. Please check that the values you provided me are correct and try again.";
    }
  }
In this method, we evaluate which operation needs to be performed and what its parameters are. With this, we perform the operation and return the appropriate message to the agent. We also handle the case where we don't receive a valid operation or any exception occurs in its calculation.
MainAgent
Now let's move on to the main agent, which is responsible for communicating with the user and delegating to MathAgent when the conversation requires performing a mathematical operation.
export class MainAgent extends Agent {
  constructor() {
    super({
      name: "MainAgent",
      description: path.resolve(__dirname, "./description.md"),
      instructions: path.resolve(__dirname, "./instructions.md"),
      tools: [],
    });
  }
}
We give it the following description:
You are the main agent of the agency. Your function is to interact with the user in a friendly manner and resolve doubts they have about mathematics by talking with the MathAgent.And the following instructions:
## MainAgent Instructions

- Maintain a natural conversation with the user, responding in a friendly manner to general questions they ask you.

- When you need to perform a mathematical operation to continue the conversation, **do not do it yourself**. Instead use the `TalkToAgent` tool to transfer that operation to the `MathAgent`. Use the response this agent gives you to continue the conversation.
With this we have the agents ready and we would only have 2 things left to do to be able to launch our agency. On one hand, create the db folder that we will use to persist data. And on the other hand, create the agency itself, for which we create a class that extends from Agency.
export class MathAgency extends Agency {
  mainAgent: MainAgent;
  mathAgent: MathAgent;

  constructor() {
    super({
      name: "Maths Agency",
    });
    this.mainAgent = new MainAgent();
    this.mathAgent = new MathAgent();
  }

  getAgents(): Agent[] {
    return [this.mainAgent, this.mathAgent];
  }

  getAgentCommunications(agent: User): Agent[] {
    switch (agent) {
      case this.user:
        return [this.mainAgent];
      case this.mainAgent:
        return [this.mathAgent];
      default:
        return [];
    }
  }

  getDBPath(): string {
    return path.resolve(__dirname, "./db");
  }
}
At this point we have everything ready to launch our agency. All that remains is to define the main.ts file in which we initialize the agency
const agency = new MathAgency();

const run = async () => {
  try {
    await agency.run();
    await agency.initApi(3001);
  } catch (err) {
    console.error(err);
  }
};
run();
Tests
To finish, let's see our agency in operation. For this, we have to go to the monorepo root and run pnpm run dev, which will make both the web and the back start in development mode. After this, we can open the url http://localhost:3000 in the browser to load the web that allows us to interact with the agency.

Let's do a first simple test to see that everything works. We open the conversation with MainAgent and, after a greeting, we tell it to tell us how much 5 times 3 is.
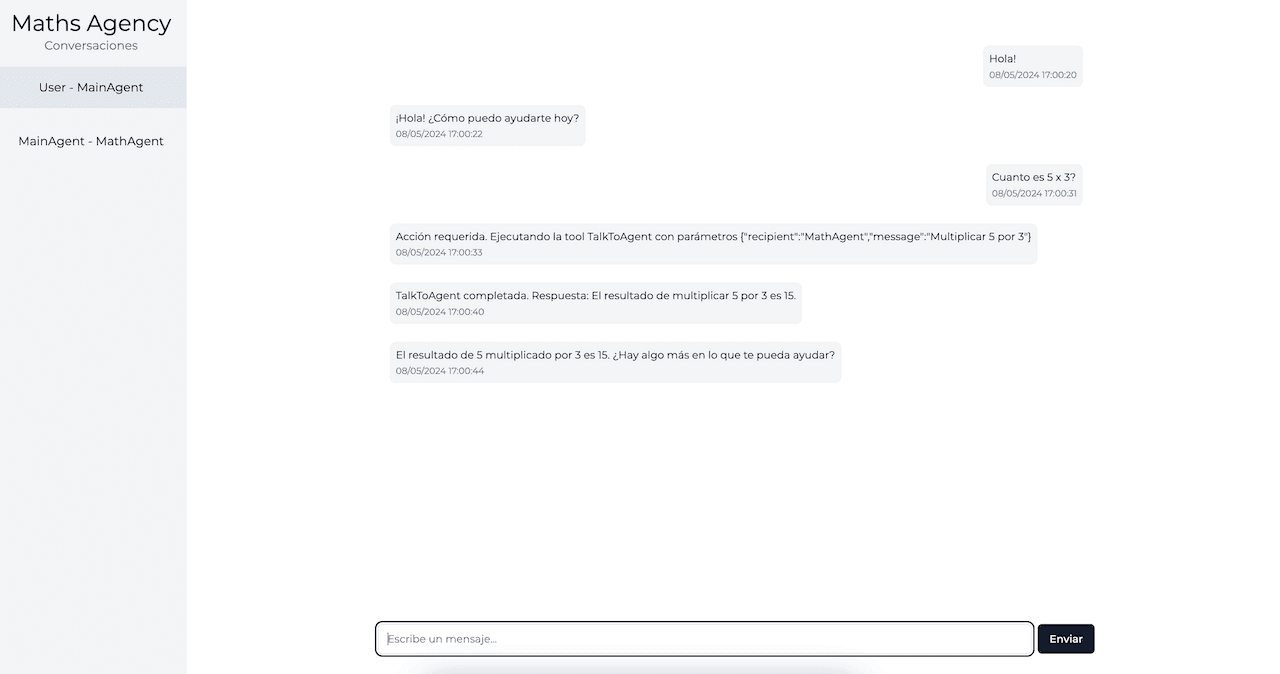
In the image we can see what happened. As soon as the agent detected that the conversation involves a mathematical operation, it executed the TalkToAgent tool to send the question to MathAgent. If we now open the conversation between MainAgent and MathAgent we see how the latter receives the question and, as it involves a mathematical operation, deduces that it must use the Operation tool to solve that operation. Then it responds to MainAgent with the solution and the latter, based on that response, responds to us.
As we can see, everything works as expected. We have 2 agents that can communicate with each other and can use tools when they consider it necessary.
Let's go with a second, slightly more interesting test to see the power of this technology. Let's delete the current conversations and start a new one. To delete them we have to remove the files from the /back/src/maths-agency/.db folder. (Yes, I know we should implement a better mechanism to clean the cache, for now we have to do it this way). Next, we are going to start a new conversation with MainAgent. In this case, we are going to propose that it solve a mathematical problem for us.
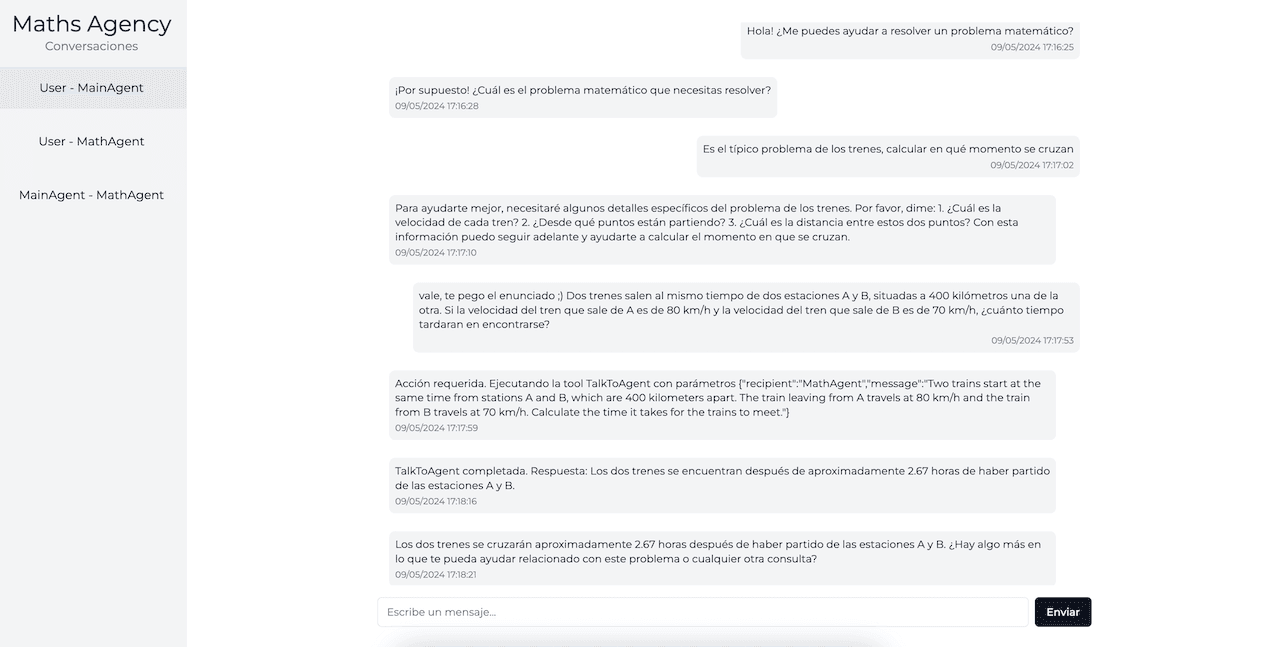
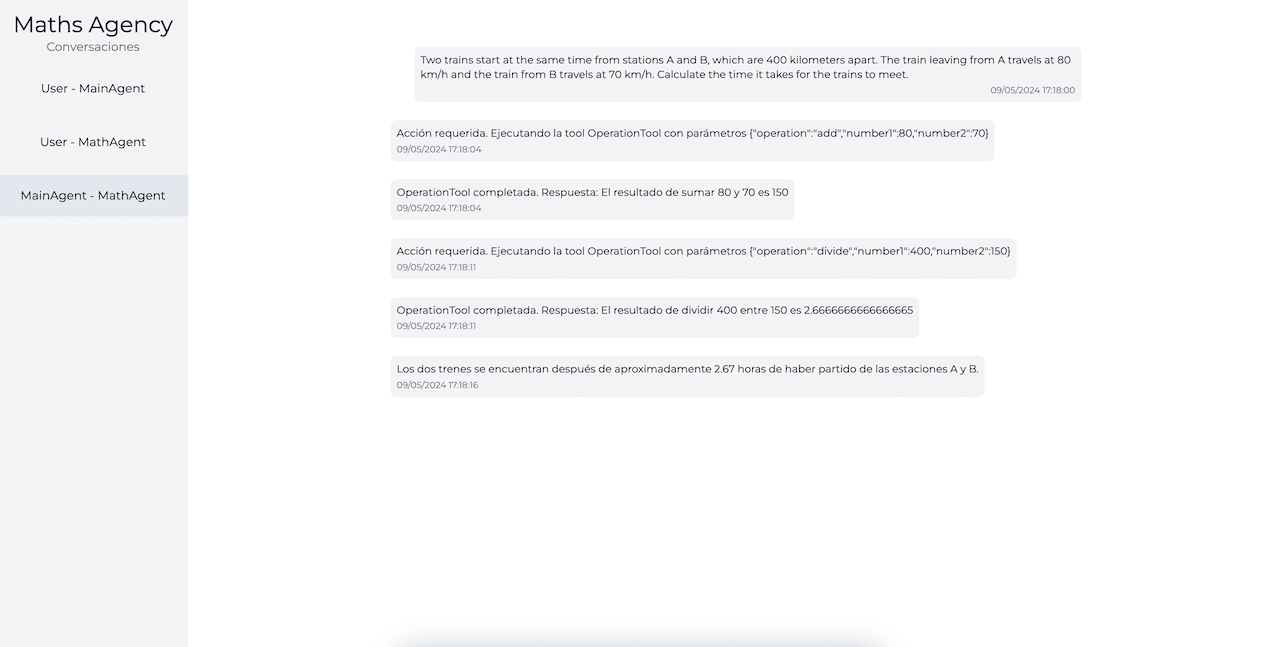
As we can see, at no time did we directly tell it that it has to solve a mathematical operation. The agent deduces by itself that to answer that question it has to use mathematical operations so it delegates it to MathAgent. And the latter deduces from the question which operations it must perform and delegates them to its Operation tool. This functionality is very powerful because, when we take it to complex problems, it gives us the possibility to create agents to whom we only have to tell what they can do and how they have to do it, but letting them decide when they have to perform the actions they consider. And as we can see, it's something they are capable of doing very well.
End
In this article, we have explored and explained a possible solution for creating AI agencies using TypeScript and a monorepo approach that allows us to extend and use this software in an agile and efficient manner.
Here is the link to the repository on GitHub where this project and everything discussed in the article is implemented. Note that this repository has several branches:
- The
maths-agencybranch contains the exact code presented in this article. We will keep this branch in its current state so that readers can see the implementation as explained in the article. - The
basebranch contains the main components of the project, such as the web interface or theagencypackage. At the time of writing this article, themaths-agencyandbasebranches will be fully aligned. However, as improvements are made to the base framework, these will be incorporated into thebasebranch. The idea of this branch is to provide a starting point for creating new agencies.
In addition to these two branches, there may be others that will contain different implementations of agencies and will correspond to subsequent articles.
I hope this article has been of interest to you and helps you understand a little better this concept of AI agencies. As we mentioned at the beginning, the implementation performed here is basic and I do not recommend it for taking a project to production. The libraries or frameworks we mentioned at the beginning of the article implement this concept in a much more robust way and provide a lot of extra tools that allow us to tackle complex problems in a much simpler way. Don't reinvent the wheel (as I have done) unless it's for learning purposes.
Finally, to finish by saying that, if anyone who is testing this project detects any type of problem or, if they want to make any type of proposal or idea based on this concept, they just have to contact me and I am more than open to help or discuss whatever it may be 😉